I think AI is having a genuinely good effect on jazz music!
There’s a lot of anxiety around AI in music at the moment, and jazz is no exception. In fact, if anything, the reaction from jazz musicians tends to be particularly negative.
I understand why. Jazz is deeply human music. It’s about interaction, identity, listening, and presence in the moment. The idea of something artificial stepping into that space feels, at best, uncomfortable.
But I think it helps to separate two very different ideas: AI as a performer, and AI as a tool.
As a tool, I believe AI is already having a genuinely positive effect on jazz—and on how we learn it.
In a previous article, I wrote about using AI for stem separation, and how useful that can be for practising musicians. Being able to take a recording and isolate exactly what a pianist is doing with their left hand, or hear clearly what the bassist is playing under a busy head, simply wasn’t possible before. If you want to play along with some of the greatest musicians who ever lived, properly isolated, it’s an extraordinary resource.
I’ve been experimenting further with this approach recently while working on Little Sunflower. For this piece, I used AI tools to remove the drums and reduce some of the density in the original recording, leaving a much more open space to play in.
What struck me immediately was how clearly the time feel came through. With less going on, you can really hear how “in the pocket” the playing is—and that changes how you respond to it. It’s not something you necessarily notice in a full mix, but once it’s exposed, it becomes impossible to ignore.
That kind of detail matters. It affects how you phrase, how you place notes, and how you listen.
Transcription is another area that has changed. The mechanical side of getting notes down is faster now, which means more time can be spent on what really matters—interpretation, phrasing, feel, and making the music your own.
Then there are AI accompaniment tools. Not everyone has a drummer and bassist available on demand, but time feel and interaction are at the heart of jazz. Being able to work on these things in a meaningful way, even when practising alone, is a real advantage.
Audio restoration is also worth mentioning. Older recordings, sometimes degraded or unclear, can now be brought back with a level of clarity that reveals details which were previously hidden. That’s not just a technical improvement—it’s a way of reconnecting with the tradition in a deeper and more direct way.
This is where I think the real value lies. These tools don’t replace the work. They don’t replace listening, or developing a personal voice, or the challenge of playing in real time with other musicians. If anything, they give us better access to the material that helps us grow.
The concern seems to come from imagining AI as a composer or performer—something that generates music in place of people. That’s a different and more complicated conversation, and one that raises valid questions.
But that’s not what I’m talking about here.
Used in the right way, AI isn’t making jazz. It’s helping musicians hear more clearly, understand more deeply, and engage more directly with the music.
And that, to me, is a good thing.
If you’re interested, I’ve written more about the technical side of this in my earlier article on AI stem separation.
My jazz tutor Matt Warnock recently flipped a familiar saying on its head. It’s not necessity, he suggested, but boredom that is the mother of invention. His challenge was simple: play over the same thing for long enough that you run out of ideas. And then keep going. That’s where the interesting stuff lives.
I took that idea and sat with a minor blues backing track for just over ten minutes. I started where most of us start — inside the familiar pentatonic boxes, playing what I know, reaching for the phrases that have always been there. Safe ground. Comfortable ground.
But I kept going.
Somewhere around the halfway mark the vocabulary started to dry up. The boxes felt smaller. And rather than stopping — which is what I usually do — I pushed through. By the final few minutes I was playing purely by ear, reaching for outside notes, deliberate dissonance, chromaticism. Stuff I’d call “tangy.” Some of it surprised me. Not all of it was pretty. But it was mine in a way that the earlier, safer playing wasn’t.
The minor blues was just the launchpad.
What strikes me about Matt’s idea is that boredom is usually the signal to stop. We run out of steam, we put the guitar down, we make a cup of tea. But boredom might actually be the threshold — the point where the rehearsed vocabulary is exhausted and something more personal can emerge. The magic isn’t despite the boredom. It’s because of it.
You don’t need to be a jazz guitarist for this to apply. Pick anything — a chord progression, a groove, a single scale — and stay with it longer than feels comfortable. Past the point where you think you have nothing left to say. See what’s on the other side.
I’d love to know how far out you’re willing to go before you pull back.
A Stratocaster for Jazz? I was reading a discussion recently about “beefing up” Stratocaster tone. You see this a lot. Suggestions about hotter pickups, thicker sounds, ways to make a Strat behave a little less like a Strat and a little more like something else.
It makes me smile.Because the more I play mine, the more convinced I am that nothing needs beefing up at all.It’s supposed to sound like that. It’s a Strat.
I play a lot of jazz on a Stratocaster. A pink Paisley one, no less. Which probably breaks expectations before a note is even played.
For many people, jazz guitar still carries a very specific image: big hollow body, dark tone, neck pickup, highs rolled off, one carefully controlled sound maintained all evening. And there’s nothing wrong with that sound. It’s beautiful. It’s part of the history. But lately I’ve been wondering whether we sometimes confuse tradition with necessity. Because when you think about what jazz actually is, the Strat starts to make enormous sense.
Jazz, at its heart, is conversation. It’s listening. Reacting. Leaving space. Changing direction in response to what someone else just played.
When that’s happening, sound can’t stay fixed. It has to move. One of the reasons I disappear for hours when playing my Strat is that it constantly asks for engagement. I’m always on the volume and tone controls, shifting colour, softening attack, swelling chords, brightening or thinning the sound depending on what I hear around me.
From a warm whisper to something close to a scream — all without changing guitars, pedals, or settings. Just touch and attention.
The clarity of a Strat does something important for jazz harmony too. Chords don’t blur. Extensions remain audible. Inner voices speak.
Instead of becoming a block of sound, harmony keeps breathing. It feels closer to a piano than to the traditional idea of jazz guitar thickness. And rhythmically, the immediacy of the attack makes time feel alive. Small differences in touch suddenly matter. Placement matters. Intent becomes audible. The guitar responds instantly — which means you have to listen instantly.
Historically, the darker jazz guitar sound made perfect sense. Early amplification demanded control and blend. Guitars needed to sit safely inside acoustic ensembles. But those practical limitations are gone. What remains is expectation. And expectation can be stubborn.
The longer I play, the less interested I am in making instruments imitate one another. A Stratocaster doesn’t need to become an archtop. Its strength is responsiveness, transparency, and movement. Tone becomes part of improvisation itself rather than a fixed identity established before the first tune. From an expressive point of view, that might make it one of the most complete jazz instruments available.
So yes — I play jazz on a pink Paisley Strat. Once the music starts, nobody seems to care what the guitar is supposed to look or sound like. They just listen.
Which, when you think about it, is the whole point.
Little Sunflower by Freddie Hubbard has been my focus this month.
I’ve been part of Matt Warnock’s online jazz study group for a number of years now. Each month we work on a different tune, and at the end of it we submit a performance for feedback—from Matt and from other players in the group. It’s a great process. There are musicians from all over the world involved, and over time you really start to hear how people develop. February’s tune was Little Sunflower by Freddie Hubbard. I love this tune, and I didn’t just want to play the tune from the lead sheet. I wanted to bring something of my own to it.
Depending on how you look at Little Sunflower, the harmony allows D and A to sit almost like drone tones throughout. That became the starting point. I set up a series of drones with swells and stutters, letting them evolve using delay, reverb and tremolo. The oscillation isn’t locked to the tempo—it moves independently—and I like what that does. It adds a sense of movement underneath everything, without being tied down.
I recorded the drones using my looper with an “empty loop” technique, then shaped them further with effects. In places I drop them out completely, just to let the piece breathe.
Everything was recorded in my little room at the end of the house—my music room. Guitar and bass are both me. The drums were part of a backing track provided by Matt for the month’s study (see my article on AI stem separation for more). I wanted to keep the whole thing fairly minimal, real, and feel like a band performance.
The arrangement grew quite naturally. The intro is made up of short chord punches that hint at the B section before moving into the full head. I play the melody in a few different ways—single line and with different harmonies—as this is something I’m submitting to my peers, so I wanted to explore that side of it a bit more.
After that there’s a solo over the form, with each A section getting a slightly different bass treatment. For the head out, the bass takes the melody. When the B section comes around, it starts in a more familiar way, then shifts—first into two-bar phrases, then into one-bar phrases. At that point it starts to feel less like a melody and more like a bass line, which opens things up for a kind of ride-out solo.
Right at the end, bass and guitar come together on the shortened B section.
I recorded and mixed everything myself. The final step was to do the live guitar take with video—one take, no overthinking—and that’s what you see here, and what I submitted.
I’ve built a bit of a reputation in the group for trying different things—textures, sounds, approaches—and for me that’s where the interest is. Just playing the tune as it sits on the page isn’t enough. I think we have to bring more of ourselves to it, and in my case that includes using technology as part of the process, not as a gimmick but as a way of shaping the music.
After submitting this, Matt shared some really kind words about it, which meant a lot given the level of players in the group and how long I’ve been part of it:
“Serge just posted his Little Sunflower Final Project, and it’s a beautiful example of what steady, patient growth can look like over time.
His playing has taken a big step forward. More atmosphere. More intention. More storytelling in the music.
For this project he didn’t just play the tune. He built an environment around it… It’s creative. Thoughtful. And very musical.
One of the things I love most is how Serge keeps experimenting… That curiosity is where real musical growth happens.”
That idea of steady growth, and staying curious, is really what this is all about. I hope you enjoyed it.
In 2024 alone, producers used AI tools to split more than 5,599,384 stems from tracks, which tells us one thing very clearly: this is not a gimmick anymore, it is how people are really remixing and practicing now.
Key Takeaways
Question
Short Answer
What is AI stem separation for remixing and practice?
It is the process of using AI to split a song into stems like vocals, drums, bass, and instruments so you can remix or practice more easily. We then shape those stems with the kind of human focus we talk about in our article on mixing to the musician.
Is AI stem separation good enough for serious mixing work?
Yes, modern models reach state of the art quality, and then proper mastering, as outlined in our mastering guide, can take separated stems to a professional finish.
How can AI stems help me practice my instrument?
You can mute or reduce your own instrument stem and play in its place, just like the way jazz players build solos step by step in our jazz soloing piece.
Can I create DIY backing tracks from my favorite songs?
Yes, AI tools can pull out vocals, drums, bass, and more so you can build custom backing tracks and even full practice albums, similar in spirit to our own Friday’s Child album project.
Is AI stem separation only for EDM and pop remixes?
Not at all, it works for blues, rock, and jazz too, which is why we love hearing classic players like Wes Montgomery through a modern AI workflow.
Do I still need mixing and mastering skills if AI is doing the separation?
Absolutely, AI gives you clean parts, but human taste and judgement are what shape a compelling mix and master, which is the core message across our articles in the Jazz ‘n’ Music section.
1. What AI Stem Separation Actually Is (In Plain Language)
AI stem separation is simply using machine learning to pull apart a full mix into individual elements like vocals, drums, bass, guitars, keys, or even ambience and noise. Instead of begging for the original studio stems, you upload a song file and let the model guess what belongs where, based on millions of patterns it has already learned.
For working musicians and hobbyists, that means you can treat any finished track like a multitrack session again. You get control where you had none, whether you are building a remix, making a practice loop, or just trying to work out what the bass player is actually doing in bar 17.
From full mix to usable parts
Most tools start with the basics, so at minimum you usually get a vocal stem and an instrumental stem. The better platforms go further and split into drums, bass, guitars, piano, and more, which is where things get really useful for both practice and production work.
Modern models reach state of the art quality and use objective metrics like SDR (signal to distortion ratio) to measure how cleanly they separate stems. AudioShake, for example, quotes a vocal model SDR of 13.5 dB on the MUSDBHQ benchmark, and that level of performance is already very workable for serious remixing.
Why this matters to “ordinary” musicians
Most of us do not have access to original studio sessions. For decades we were stuck with stereo mixes and our ears, and if the vocal was too loud or the drummer was washing everything with cymbals, tough luck.
AI stem separation cracks that problem open for the rest of us. It gives the kid in a bedroom, or a veteran player practicing for a gig, the sort of access that only mixing engineers used to have.
2. How AI Stem Separation Works Behind The Scenes
You do not need to be a data scientist to use AI stems, but understanding the rough idea helps you choose tools better. In simple terms, the model has listened to a huge amount of labeled audio and has learned what drums “look” like, what vocals “look” like, and so on, in a very high dimensional space.
When you feed a new track in, it tries to reconstruct the song as a combination of these learned sources. If it has been trained well and is using enough compute, it can get surprisingly close to studio-quality stems, even from a single stereo file.
Quality vs compute: why some tools sound better
On the technical side, newer models like Perseus have improved vocal extraction quality by about 15 percent over older versions like Orion, at the cost of using 3.5 times more resources. That trade off is typical: better separation usually means more computation, which might mean longer processing times or higher subscription tiers.
Some platforms cover as many as 17 or more separate stems, which is great if you want fine control of every element. Others focus on doing fewer stems really well, for example just vocals and instruments, or voice and noise for podcast cleanup.
Why benchmarks and SDR scores matter
Benchmarks such as MUSDB18 HQ or MUSDBHQ give us a common way to compare tools. A model like BS-RoFormer, with an SDR average of 11.99 dB on MUSDB18 HQ, is already competitive, but when you see claims like “Music AI SDR score is 15.8 percent higher than the nearest competitor on average,” that tells you separation is improving fast.
For practical work, the real test is always your ears. Numbers help you pick a starting point, but you still need to listen in context, then decide how much cleanup you are willing to do in your DAW.
3. Why AI Stems Are Perfect For Remixing
Remixing used to mean either you had the official stems or you were wrestling with EQ tricks on a stereo file. AI stem separation changes that because any well mixed track can become raw material, almost like a demo session delivered late at night to your laptop.
In 2024, the most commonly extracted stems were vocals, instrumentals, and drums, which lines up exactly with what remixers reach for first. Strip the drums out, rebuild a groove, keep the vocal, and you are already halfway to something new.
Common remix workflows with AI stems
Pull the vocal stem out and write completely new harmony and chords under it.
Mute the original drums, program your own kit, and keep only the bass and vocal.
Flip things on their head and remix using only the drum and bass stems as a starting loop.
Because platforms like Music AI process over 2.5 million minutes of audio per day with a 99.90 percent uptime guarantee, turnaround is usually quick enough that you can experiment freely. You upload, download the stems, and you are already in the DAW world that we know from traditional sessions.
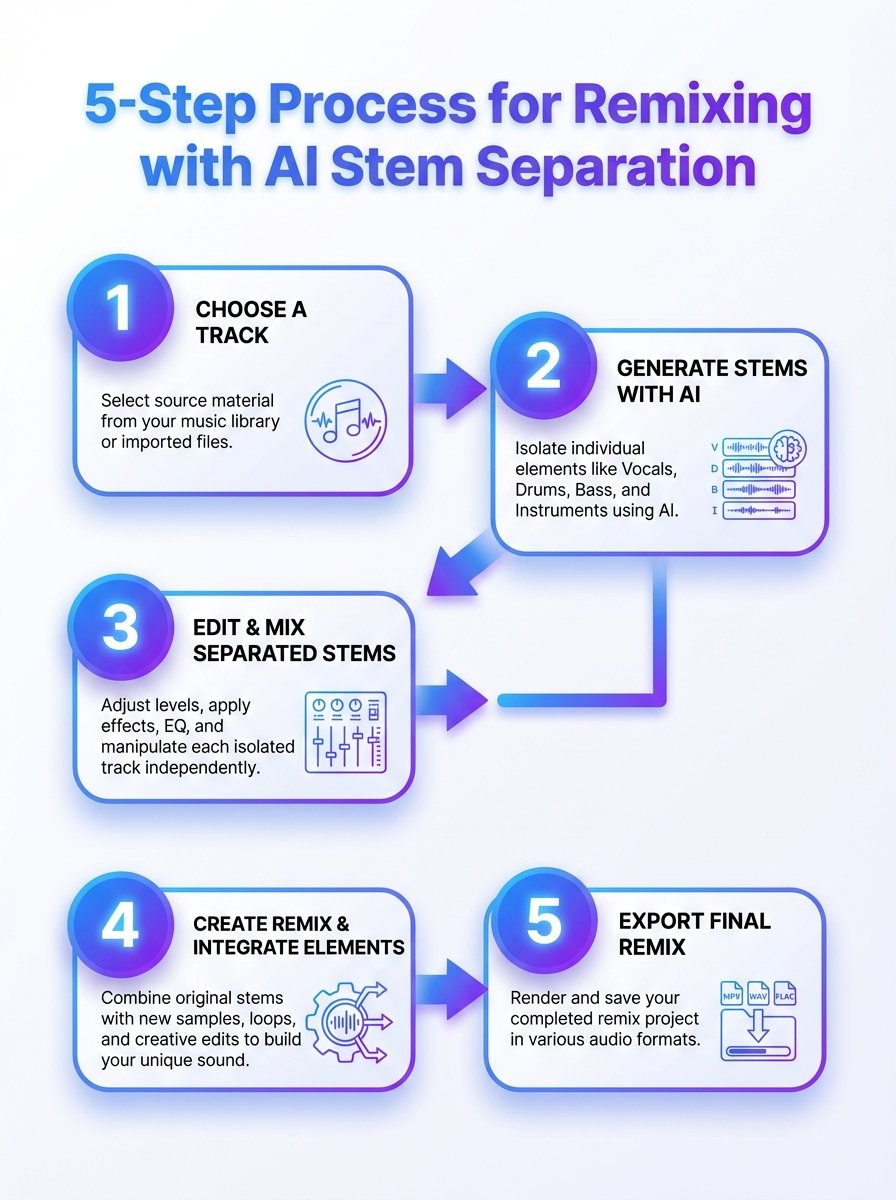
A 5 step AI stem remixing process
A 5-step guide to using AI stem separation for remixing and practice. Learn how stems are isolated and recombined to speed up workflows.
Our own approach for a remix is usually:
Pick a track with a vocal performance that moves you, not just a popular chart tune.
Separate into at least vocal, drums, bass, and “other”.
Audition each stem on its own, listen for artifacts, and clean with EQ or gating where needed.
Rebuild the groove or harmony around the vocal or another focal stem.
Mix with the same care you would give to real session stems, then master at the end.
Did You Know?
Music AI reports a 15.8% higher SDR score than its nearest competitor on average, which means noticeably cleaner stems for your remixes and practice tracks.
4. Building Practice Backing Tracks With AI Stems
For many of us, the real magic of AI stem separation is not the flashy remix, it is the simple ability to practice with the band we always wanted. You can mute your instrument in the mix and sit where that player used to sit, which is a brilliant, slightly terrifying, way to see what you can really do.
Guitarists can pull out the guitars and comp or solo over the original rhythm section. Drummers can remove the drum stem and play along with the intact bass, keys, and vocals, which is very close to a live rehearsal scenario.
Instrument specific practice ideas
Guitar: Remove guitars, loop tricky sections, slow down in a DAW, and study phrasing against the original vocal.
Bass: Solo the bass stem to transcribe, then mute it to test your own line with the drums and harmony.
Drums: Isolate drums to learn fills and ghost notes, then mute to practice your own grooves under the same song.
Vocals: Solo the vocal stem, work on timing and pitch, then sing against the instrumental stem.
This is particularly powerful when you approach soloing the way we describe in our jazz material: making more of what you already do, instead of hunting for magic scales. With stems, you can live in the pocket of a great rhythm section for hours, which is where real progress hides.
Turning albums into practice libraries
Once you get into the habit, you start thinking in albums, not tracks. Entire releases, like our own Friday’s Child, can be turned into structured practice sets where you have clear stems for rhythm, harmony, melody, and solos.
It is the sort of thing that, in the past, only education publishers did with very controlled multitracks. Now you can quietly build your own library at home and work through it at your own pace.
5. Practice Routines Using AI Stems (For Real Life Schedules)
We know what it is like to juggle work, gigs, and training on the bike. Fancy tools are useless if they do not fit into a messy day, so here are simple, repeatable ways to use AI stems without needing a spare lifetime.
The key is to keep things narrow: one song, one weak spot, one short loop, repeated often. AI does the heavy lifting of separation, you just show up and do the reps.
30 minute guitarist routine
5 minutes: listen to the original track once, no guitar in your hands.
10 minutes: loop a verse and chorus with the guitar stem soloed, and quietly sing or tap the rhythm of the part.
10 minutes: mute the guitar stem and play along, recording yourself on your phone.
5 minutes: compare your take against the original guitar stem and make one note for tomorrow.
For bassists and drummers, you can use exactly the same timing but swap which stems you listen to or mute. Vocalists can create A/B loops between the original vocal and their own take against the instrumental stem.
Longer weekend sessions
On days where you have more time, AI stems let you go deeper without getting lost in tech. You can separate a whole album in advance, label stems clearly, and then run longer play along sessions, switching songs while keeping your focus on one concept like time feel or phrasing.
It is the opposite of gear chasing. Once the stems are ready, all you are left with is you, your instrument, and the band that used to live only inside the stereo mix.
Did You Know?
LALAL.AI users uploaded 9.7 million files in 2024, fueling a huge wave of custom remixes and practice tracks built from AI-separated stems.
6. Mixing AI Stems So They Actually Sound Musical
Once you have your stems, the job is not finished, it is just familiar again. You are back in the world of levels, EQ, compression, and, most importantly, the human behind the performance.
In our own work, we always go back to what we call mixing to the musician. Two vocal stems might have the same frequency curve, but one singer is fragile and the other is bold, and they need different treatment if you want the mix to feel honest.
Cleaning up AI artifacts
Even the best models will leave you some work to do. You might hear light bleed from drums in a vocal stem, or a bit of the bass still living in the guitars, especially in dense mixes.
Typical fixes include:
Narrow EQ cuts on obvious bleed frequencies.
Noise gates or expanders on percussive or vocal stems.
Short fades around edits to avoid clicks, especially when looping sections.
Balancing stems like a normal session
After cleanup, you mix as you usually would. Set a solid rough balance, work on the drums and bass relationship, fit the vocal in, then decorate cautiously with effects.
We like to think of AI stems as being like a slightly messy live multitrack. If you maintain that mindset, you focus on musical problems instead of chasing technical perfection that does not really matter to anyone listening.
7. Mastering Tracks That Started From AI Stems
Once a mix feels right, mastering is still essential, no matter how clever the separation stage was. AI does not change the basic truth that mastering is about consistency, translation, and a sensible final polish.
As we explain in our mastering article, the goal is to have a track that sounds balanced and confident on phones, cars, cheap speakers, and a good studio system. AI stems can give you a great mix, but they will not make that last ten percent of finishing decisions for you.
Specific mastering checks for AI stem projects
Low end coherence: Make sure any slight separation smear between kick and bass has not turned into a muddy low end.
Top end harshness: Check that any AI artifacts have not left a “hiss” in the 8 kHz to 12 kHz range.
Phase issues: When stems are recombined, always check mono compatibility, especially with drums and wide guitars.
Loudness is a creative choice, but AI does not get you a free pass there either. We still recommend leaving enough headroom and dynamic range so the track can breathe, even if streaming platforms will normalise it later.
8. Top AI Stem Separation Use Cases For Working Musicians
We see AI stem separation showing up in all sorts of practical, slightly unglamorous ways, which is usually a good sign that a tool is genuinely useful. It is not just bedroom producers, it is teachers, cover bands, and even people preparing for radio or streaming features.
Here are some of the most common use cases we encounter when talking with other musicians.
Everyday uses
Cover band prep: Create key shifted, instrument specific backing tracks for live sets.
Teaching: Build slow, instrument focused versions of songs for students to practice.
Content creation: Prepare short stems for reels or YouTube breakdowns without needing the original session.
Archiving: Pull elements out of old demos and rework them with new arrangements.
For radio features or online premieres, AI stems allow you to make alternate mixes quickly, for example a more voice forward version for spoken intros. When we hear our own tracks on stations or playlists, we are very aware that flexibility counts.
Genre specific workflows
Jazz players might focus on rhythm section stems to study comping under solos. Blues and rock guitarists might live mostly in vocal and guitar stems to pick apart phrasing and bends from players like Peter Green.
Electronic producers might only care about drums and melodic hooks, using AI stems to resample and reshape loops into something completely unrecognisable from the source.
9. Limitations, Legal Questions, And Good Habits
AI stem separation is powerful, but it is not magic, and it does not remove your responsibility to think. There are technical limits and legal questions that every musician should at least be aware of.
On the technical side, extremely dense mixes, live recordings, or tracks with heavy effects can still confuse models. You might get more artifacts or bleed, and sometimes it is genuinely quicker to pick a cleaner song.
Legal and ethical points
We are not lawyers, so we will not pretend to offer formal advice here, but some broad principles are sensible:
For private practice, pulling stems from commercial tracks is generally low risk, and similar to playing along with a record.
For commercial remixes or releases, you still need the relevant permissions or licenses, regardless of how you got the stems.
For teaching content, many creators work under fair use or similar concepts, but local laws differ, so it is worth checking.
Ethically, it helps to remember there is a person behind every performance, just like we write about in our mixing article. Respect for that person’s work should guide how loud you shout about your AI separated stems in public.
10. Choosing An AI Stem Separation Tool That Fits You
There are plenty of tools out there, and new ones keep appearing, but you do not need to overthink it. Start with what you actually want to do, which is usually remix tracks, build practice material, or clean up audio for teaching and content.
Key questions to ask yourself include how many stems you need, how patient you are with processing times, and whether you want a web tool or something that runs inside your DAW.
Features that matter in daily use
Stem count: Do you just need vocals and backing track, or do you want drums, bass, guitars, keys, and more?
Quality: Look for clear examples and, if possible, references to benchmarks like SDR or independent tests.
Speed: Daily throughput numbers such as “2.5 million minutes per day” hint at how scalable a platform is.
Workflow: Simple export options into your DAW, clear file naming, and stable uptime all save you time.
Remember that you can always change tools later. The bigger decision is not which brand you pick, it is whether you commit to using AI stems as a regular part of how you practice, remix, and learn.
Conclusion
AI stem separation for remixing and practice is not science fiction anymore, it is just another tool in the bag, like a decent compressor or a metronome that does not argue. Millions of files and stems processed each year prove that ordinary musicians, teachers, and producers are already using it quietly in the background.
From our point of view, the real value is simple. AI helps you hear more clearly, gives you better material to work with, and then gets out of the way so you can do the one thing it still cannot do, which is to sound like you.
I was lucky enough to get paid to play a recording session yesterday at a local studio here in France, for visiting American songwriter and producer Dana Walden.
If anyone would like to know more — how I got the work, how I prepared, what gear I took, how it actually went — please ask and I’ll do my best to answer. Needless to say, it was a fabulous day, and I consider myself very fortunate.
There were two key takeaways I wanted to share:
1. You must be able to play in all keys. I had to play a song in three different keys straight off, to find which suited the singer best. Luckily it was a simple pop song, but the ability to move freely between keys was essential.
2. Ear training pays off. Dana wanted a short guitar intro and asked me to play him some ideas. He liked a couple of things I played. Then he sang a line to me and asked me to play it back. I was so glad I had worked through those ear training exercises.
How it went…
I met Dana the day before. He wanted to meet and talk through the project, and he was really nice, so I didn’t feel nervous. We were only recording one tune that day — just him, the chanteuse, and me.
Knowing the song ahead of time meant I was able to work out some nice chord voicings and pathways, while still leaving plenty of scope to improvise. Dana was clear about what he wanted and told me when he liked something and wanted more of it.
Style-wise, I’d assumed it was going to be jazzy — that’s why the woman who booked me had booked me — but Dana wanted a more pop approach.
On the day, the engineer was set up and ready when I arrived. I sat in the control room and plugged straight into the desk, playing to a drum track with some piano parts the producer had prepared that morning. I played from the notes I’d made the day before, while Dana sang a placeholder vocal and conducted me through the arrangement.
I put down a couple of takes using different ideas. When the singer arrived we had a few more run-throughs, then the producer asked me for a final take — just embellishments and fills. After a couple of hours, my work was done. The rest of the session belonged to the singer.
One small thing I hadn’t anticipated: I’m used to a two-bar count-in, but the studio DAW was set up for just one bar. That caught me out on the first take! Afterwards I found myself thinking about how much studio time that must save over the course of a few months.
Hopefully I’ll get a copy of the finished track when it’s done.
How I got the gig…
I’m not a working professional musician. Being a professional musician in France is complicated — the rules are quite something. On paper, I’m retired.
I got this gig by being in the right place at the right time. I’d done a short gig with Lyda, my Dutch opera singer friend, and the woman who booked me happened to be in the audience. She loved what we did and got in touch — she was looking for a guitarist, she liked what I played, and she showed some of my YouTube videos to the producer. He thought I was worth a try. I was halfway there before the session even began.
On my morning walk yesterday, something clicked. I was thinking about an upcoming concert I’m organizing for a friend—a singer, with hired musicians, mp3s to learn from—and I found myself anticipating all the little moments where things wouldn’t be perfect. Where someone would need help navigating a tricky change. Where the band would need to function as a safety net, not just a backing group.
That’s when I remembered the phrase: hand holding.
Not in a condescending way. More like the quiet, generous act of helping someone—or being helped—through a tune in real time. And as I walked, I realized something odd: in 50 years of playing guitar and 15 years of serious jazz study, I’d never heard anyone actually talk about this.
The Silent Skills We Never Name
We talk endlessly about scales, voicings, comping patterns, and phrasing. We analyze solos, transcribe lines, and work through Real Books. But the subtle art of keeping the music together when things aren’t perfect? That lives in the shadows.
Yet it’s happening constantly. Visual cues—a nod, eye contact, the angle of your guitar neck pointing toward the next section. Physical signals—a bassist’s head bob on beat one, a pianist’s shoulders lifting before a key change. And musical cues—walking up chromatically to telegraph where we’re going, voicing a turnaround more clearly when you sense someone’s lost, creating tension that signals release is coming.
This is the connective tissue of live performance, especially in jazz where so much happens in the moment. But somehow, it’s treated as something you just “pick up along the way” rather than a skill worth discussing, let alone teaching.
Two Moments That Brought This Home
The concert prep was one trigger. I’ve hired good musicians, and I’ll send them charts and recordings. But I know from experience they won’t have every tune locked down perfectly. Someone will miss a turn. Someone will hesitate at a bridge. And in those moments, the band needs to be ready—not to judge, but to guide.
The second moment was more recent. I was playing with a drummer—a great drummer—who’s lost some hearing after decades of loud gigs. I found myself instinctively adjusting. Playing with a more defined tone. Making my phrasing more obvious. Not dumbing things down, but creating clearer landmarks for him to navigate by.
“Playing with a more defined tone. Making my phrasing more obvious. Not dumbing things down, but creating clearer landmarks to navigate by.”
And as I did this, I realized: nobody taught me this. I learned it by playing with people who did it for me when I needed it. By watching how generous players supported the music rather than just showing off their own skills. By being rescued, and eventually learning to rescue others.
Taking the Risk
After that walk, I felt like I’d stumbled onto something worth discussing. So I posted about it in the private study space my jazz tutor runs—a forum where his students share ideas and experiences.
I’ll be honest: I was nervous. Sticking your head above the parapet always feels vulnerable, especially when you’re naming something that doesn’t seem to have a name. What if everyone thought, “Well, obviously—why are you even bringing this up?” What if nobody responded at all?
But I posted it anyway. Described the hand holding concept, the two situations that prompted it, and asked if anyone else had thoughts on this unspoken aspect of playing together.
The Response That Validated Everything
My tutor’s response was better than I could have imagined. He called it “a really perceptive observation” and said I was right—it’s almost never taught explicitly. He wrote:
“What you’re describing is musicianship beyond notes. It’s the quiet language that keeps the music moving when things aren’t perfect—which, of course, is most of the time in real playing situations.”
He loved the phrase “hand holding” because it captured the spirit perfectly. Not control. Not correction. Support.
Then he added something that really hit home: “That’s not ‘dumbing things down.’ That’s taking responsibility for the music.”
When I adjusted my playing for the drummer with hearing loss, I wasn’t compromising my musicianship—I was using it in service of the collective result. That’s a fundamental shift in perspective: from “what do I want to play?” to “what does the music need right now so we can stay together?”
“That’s not ‘dumbing things down.’ That’s taking responsibility for the music.”
Living in the Cracks
My tutor explained why this skill rarely gets taught: it lives in the cracks between the things we do teach. It’s not theory. It’s not technique. It’s not repertoire. It’s awareness.
You learn it by playing with people, making mistakes, being rescued, rescuing others, and slowly realizing—as he so beautifully put it—that “clarity is kindness on the bandstand.”
Think about the moments that stay with you. Someone walking you into a bridge with a clear bass line. A pianist playing a louder chord on beat one when they sense you’re drifting. A horn player shaping a phrase so clearly that the form suddenly makes sense again. Those aren’t flashy moments. They’re generous ones.
What This Means for How We Play
After 50 years of playing, I’m still discovering layers to this craft. And what strikes me about this particular insight is how fundamental it is. We spend so much time developing our individual voice—our tone, our vocabulary, our improvisational chops—but jazz is ultimately a conversation. And in any good conversation, you’re not just expressing yourself; you’re listening, responding, and sometimes gently guiding.
The players who keep the music together aren’t necessarily the ones with the fastest fingers or the hippest lines. They’re the ones who:
Play with clearer phrasing when needed
Create more obvious harmonic motion at crucial moments
Maintain a stronger time feel to anchor everyone else
Use slightly exaggerated cues in sound and body language
These aren’t tricks or shortcuts. They’re acts of musical leadership and care.
Still Learning After All These Years
What keeps jazz endlessly fascinating—even after five decades—is that there’s always another layer to discover. Just when you think you’ve got a handle on the music, you realize there’s this whole dimension of unspoken communication you’ve been participating in without fully seeing it.
My tutor suggested this could be an ongoing conversation in the study group, because while we may not be able to “teach” it in the traditional sense, we can learn to notice it, name it, and value it.
I think he’s right. And I think it starts with recognizing that supporting your fellow musicians—hand holding, if you will—isn’t a beginner skill you outgrow. It’s an advanced form of musicianship that deepens the more you do it.
The next time you’re on the bandstand and you catch yourself walking up to a change more obviously, or nodding toward the turnaround, or voicing that chord progression a little more clearly—recognize what you’re doing. You’re not holding the music back. You’re holding it together.
And that might be the most important thing we do.
Have you experienced moments of musical hand holding—either giving or receiving support on the bandstand? How do you think about this unspoken dimension of playing together? I’d love to hear your thoughts in the comments below.
70 Years Old… 2025 was a milestone year for me as I turned 70. One minute I was 15 and couldn’t even imagine being 21, and now here I am. Happy to be here and considering myself lucky considering some of the tricks I used to get up to. I’m still mostly in tact. Still riding my bike, and playing my guitar and enjoying life. What more could I ask?
10,000 kms ridden… I had set myself the goal of cycling 10k kilometers this year, and I did it with three weeks to spare. I have to say that I enjoyed every pedal turn. Spring and autumn were best. The Haute Vienne is so beautiful then. I go out on my bike and the fairies put me under a blissful spell which is only broken by the realization that I am under a spell.
Full Back Tattoo… I finally got that full back tattoo I’ve always wanted. I used to go to the swimming baths in Brierley Hill in my young teens. There were some young men there who could do amazing dives from the top diving board. They could swim fast. Some of them had tattoos. I was in awe of them. I wanted to be one of them. One in particular had a full back tattoo. I decided that one day I would have one too. I thought about it in my early 20s, but never got round to it. Again as my 40th approached I thought of it. Even asked an artist I knew if they would create a design for me. They didn’t! Same again when I was 60. And now, for my 70th I finally got it done. Thanks Grok! 🙂
Happy New Year everyone! May 2026 be your best year ever.
I’ve done a lot of mixing over the last 40 years. It’s something I have studied, something I have a qualification in. After four decades behind the mixing desk, I’ve come to realize that the most crucial skill isn’t knowing which frequency to boost or cut—it’s learning to hear the person behind the performance.
Beyond the Technical Checklist
Every mix starts the same way: import the stems, clean up the noise, set levels, apply EQ. But somewhere between the mechanical cleanup and the final bounce, something more nuanced happens. You stop mixing instruments and start mixing musicians.
Take two guitarists playing identical Les Pauls through the same amp. The frequency spectrum might look similar on paper, but their sonic fingerprints are completely different. One player might have a aggressive pick attack that needs taming in the upper mids, while another’s lighter touch might need some presence boost to cut through. It’s not just about the gear—it’s about the human touching that gear.
The Personality in the Performance
Every musician brings their own physical relationship to their instrument. The drummer who hits slightly behind the beat versus the one who’s always rushing. The bassist who digs in with their fingers versus the one who floats over the strings. The vocalist who breathes audibly between phrases versus the one who barely makes a sound.
These aren’t flaws to be corrected—they’re the essence of what makes that performance unique. My job isn’t to make everyone sound the same; it’s to make each person sound like the best version of themselves within the context of the song.
“Essentially you’re creating a sonic portrait that honours both the musical context and the human element behind each performance.”
Context is Everything
This individual approach doesn’t happen in isolation. Genre matters. A jazz guitarist’s laid-back phrasing needs different treatment than a country picker’s crisp attack. The same Telecaster gets completely different EQ curves depending on whether it’s cutting through a dense rock mix or sitting in a sparse folk arrangement.
But even within genre conventions, individual personality trumps everything. I might start with my “rock guitar” EQ preset, but that’s just the beginning of the conversation, not the end.
The Art of Invisible Enhancement
The best mixing happens when you can’t hear the mixing. When a guitarist listens back and says “That’s exactly how I sound,” even though you’ve made dozens of subtle adjustments to get there. You’re not changing their sound—you’re revealing it more clearly.
This requires a different kind of listening. You have to hear not just what’s there, but what’s trying to be there. The intent behind the performance. The musical conversation happening between players. The emotion that might be buried under technical imperfections.
Learning to Hear the Human
Developing this skill takes time and, frankly, a lot of mistakes. Early in my mixing adventures, I treated every instrument like a technical problem to solve. Kick drum too boomy? Cut at 200Hz. Guitar too harsh? Notch out 3kHz. But music isn’t a series of technical problems—it’s human expression filtered through wood, metal, and electricity.
The breakthrough comes when you realize that the “problem” frequencies in one context might be the magic in another. That slightly nasal quality in a vocalist might be exactly what gives their performance character. That slightly loose snare hit might be what makes the groove feel alive.
“This kind of listening requires both technical knowledge and emotional intelligence. You have to hear not just frequency content and dynamic range, but intent, personality, and musical conversation between players. It’s why two mixers can use identical equipment and techniques yet produce completely different results.”
Still Learning After All These Years
What keeps this work engaging after four decades is that no two musicians are exactly alike. Each new project brings fresh challenges, unexpected combinations, and opportunities to discover something I haven’t heard before. The technical skills become intuitive, but the human element—that’s always evolving.
The day I stop hearing new nuances in how different people make music is the day I should probably call it a day. Fortunately, after 40 years of listening, I’m still as curious as ever about the person behind the performance.
The Bottom Line
Great mixing isn’t about perfect frequency response or flawless dynamics. It’s about understanding that every performance carries the DNA of the person who created it, and your job is to help that DNA express itself as clearly and powerfully as possible.
When you mix to the musician rather than just the music, something magical happens. The technical becomes artistic. The mechanical becomes human. And the final mix doesn’t just sound good—it sounds right.
What aspects of a musician’s personality do you hear in their playing? How do you approach capturing the human element in your own mixing work? Share your thoughts and experiences in the comments below.
I spotted some mastering tips from top multi-platinum producer Warren Huart. I’ll post those below, but before I do, it got me thinking…..what is mastering, what’s the goal, why do we need to do it?
Well, the goal of mastering an audio track is to ensure it sounds polished, balanced, and consistent across all playback systems. It is the final step in the music production process, refining the mix to meet industry standards before distribution. The sprinkling of the fairy dust.
Here’s why it’s done…
Consistency Across Playback Systems – Mastering ensures the track sounds good on different systems (headphones, car speakers, club PA systems, etc.).
Loudness Optimization – Brings the track to a competitive volume while maintaining dynamics and avoiding distortion.
EQ and Tonal Balance – Corrects any frequency imbalances to ensure clarity and cohesion.
Dynamic Control – Subtle compression and limiting ensure the track has impact without being over-compressed.
Stereo Enhancement – Adjusts stereo width to create an immersive listening experience.
Track Sequencing (for albums/EPs) – Ensures smooth transitions between tracks and maintains a cohesive feel.
Format and Distribution Readiness – Prepares the track for streaming services, vinyl, or CD with appropriate loudness and encoding.
Even with a great mix, mastering is crucial for giving a track its final professional touch and making it competitive in the market.
Here’s Warren’s top ten tips…..
Start with a Well-Mixed Track. Mastering cannot fix a poor mix. Ensure your mix is balanced, with proper EQ, dynamics, and stereo imaging before mastering.
Use the Highest Quality Audio File Possible (Please No MP3!). Always master from a 24-bit or 32-bit WAV or AIFF file with at least 44.1 kHz sample rate. Never use MP3s or other lossy formats, these degrade sound quality and reduce mastering effectiveness.
Set Proper Headroom. Leave -6 dB to -3 dB of headroom in your mix to prevent clipping when mastering.
Use Subtle EQ Adjustments. Use a linear-phase EQ to correct any minor tonal imbalances. Avoid extreme EQ boosts or cuts—small adjustments (±1-2 dB) go a long way.
Control Dynamics with Compression
Use gentle compression (Ratio 1.2:1 to 2:1) to smooth out dynamics. Apply parallel compression if you need more punch without squashing transients.
Check and Maintain Stereo Balance. Use a stereo imager to ensure width is natural, avoiding excessive widening that may cause phase issues. Keep low frequencies (below 150 Hz) in mono for a solid bass foundation.
Reference Your Track Against Professional Mixes. Compare your master with similar songs in the same genre to match tonal balance, loudness, and stereo width.
Check on Multiple Playback Systems. Test your master on studio monitors, headphones, phone speakers, car speakers, and club systems to ensure consistency.
Take Breaks & Trust Your Ears. Avoid ear fatigue by taking breaks every 30-45 minutes. Mastering should be done at moderate levels (around 75-85 dB SPL) to prevent biased decisions.
All great tips. The stand-out ones for me are… #8. I think using a reference track is essential. Choosing the right one is another thing in itself. #9, yep, you gotta check it on everything you can, car, phone, tablet, Hi-Fi, PC the lot. #10 trust your ears. Yes, but know your ears! I’ve found that as I’ve got older my ears can’t be trusted. I always have to take extra care with the top end because it’s harder for me to hear. I usually get Carla to check it, she has fantastic ears.