It’s easy to miss a scene like this on a morning walk. But when the low light catches the dew, the whole thing lights up.
A spider’s web, spun on a rusty wire fence. Delicate geometry laid across a rigid grid — nature making use of whatever hard edges it finds. I stood there longer than I meant to, then got out my phone and shot twenty-five seconds of it in slow motion, set it to a piece of ambient piano composed and played by my friend Lyda Van Tol, and watched it back a few times. Most people would walk past this without seeing it at all. They’re too busy. I nearly was too.
But it stayed with me, and it got me thinking about the work we do — the creative work, whatever form it takes.
Building on the frameworks we’re given. The spider didn’t wait for a pristine place or perfect conditions. It took a man-made boundary — cold, square, and barbed — and turned it into the anchor for something intricate. That fence wasn’t built with this in mind. It was strung up to keep livestock in, to mark a line in a field, nothing more. The spider didn’t ask permission to repurpose it. It just used what was there. We do the same in our creative lives, — finding room for expression inside whatever rigid constraints or imperfect tools happen to be in front of us. The constraint isn’t the obstacle to the work. Half the time, it’s the reason the work has any shape at all.
The grace of the temporary. A dew-soaked web might not last. Rain, wind, or just the heat of the afternoon sun will take their toll by evening. And yet, under that early light, the effort put into something so fragile felt entirely complete. Nothing about it was waiting to be finished later. That’s a quiet nudge to take pride in the process of creation — the focus of the moment — rather than worrying about how long the artifact will endure. The web wasn’t a draft of something more permanent. It was the whole thing.
Leaving room for the space. Much like a sparse musical line, where the silence between the notes does the heavy lifting, this scene relies on stillness. Strip away the background noise, let a single moment breathe, and a rusty piece of fence becomes something far deeper. The fence didn’t create that stillness. I did, by finally stopping long enough to notice it. The web was there, the silence was mine to bring or not bring.
Which is maybe the real reason I didn’t just look and walk on. I filmed it, and set it against Lyda’s piano, because looking at a beautiful thing made me want to make a second one — a small, equally temporary record of the first, that will live differently depending on where it ends up and how long anyone actually watches it before scrolling past. One fragile thing, answering another.
Sometimes the most profound observations are just waiting for us to slow down enough to notice the light hitting the dew.
A fellow member of my online jazz guitar community posted a link to a neuroimaging study on jazz improvisation this week. He introduced it with admirable economy: you may or may not be interested, but to summarise — just let go, but practice a lot first.
He wasn’t wrong. But the summary, for all its wit, compresses out the most interesting territory.
The study centres on work by Limb and Braun, who put professional jazz pianists into an fMRI scanner and compared what happened in the brain during memorised performance versus free improvisation. The finding wasn’t that the brain worked harder during improvisation. What they found was a dissociation: the region governing monitoring, planning and cognitive control went quiet, while the area associated with self-expression and internally generated thought lit up. The editor left the room. Something else took the chair.
The article makes a point that caught my eye. It states that flow states are not available to beginners. A pianist six months into their studies who stops monitoring their left hand doesn’t enter a creative state — they hit wrong notes. The release of monitoring that produces flow is only possible when what was being monitored has become automatic. The freedom comes after the constraint, not instead of it.
I sat with that for a while. And I’m not sure it’s entirely right.
I don’t think the threshold is binary. I don’t think there’s a day when you can’t do it and then suddenly you can. I think the state is available earlier than the study implies — but only if the demands on the substrate are reduced enough to make room for it. Which is, I’d argue, exactly what good teaching does.
My tutor Matt Warnock uses a device that illustrates this perfectly. He’ll give a student just three notes to solo with. Not three chords, not a scale. Three notes. The monitoring burden drops to almost nothing. The decision anxiety evaporates. And in that protected space, even a relative beginner can briefly touch what flow actually feels like. Not a simulation of it. The real thing, in a reduced form — a flame in a sheltered corner.
The constraint produces the freedom.
I’ve found versions of this myself. Solo on one string and a particular vibe arrives, partly because it has to. Play in octaves and every note becomes declarative — you can’t throw anything away. Never land on the one and the groove has to be implied rather than stated, which changes your relationship to time entirely. The restriction in one place doesn’t block creativity. It might not even be creativity. It might be something closer to necessity. I’m not tall enough to reach the shelf without thinking, so I stand on my toes.
This morning I was out on the bike, and the whole question followed me up the road.
In cycling, a flow state isn’t optional. Things come at you too fast for micro-management. You have to draw back, look at the bigger picture, look further ahead to where you want to go — and hand off the braking, the balance, the trajectory, to somewhere below conscious thought. Surrender to the flow. Trust the instinct.
There’s a term for it: reading the road. You’re not reacting to what’s under your wheel. You’re reading twenty metres ahead and letting the body handle what’s underneath. The hands and the balance go downstairs so that the eyes and the mind can operate at a higher altitude.
Jazz does exactly the same thing. When the changes are coming thick and fast, the player watching their fingers is already behind. The player who has handed the mechanics downstairs and is looking ahead — to the phrase, to the landing point, to where the line wants to resolve — that player is riding the music rather than being chased by it. Reading the changes the way you read the trail.
I used to choose a melody before the start of a race. Deliberately, in the same way you might check your tyre pressure or pin your number. I’d found empirically that it worked — that having something playing internally kept the conscious mind lightly occupied and stopped it interfering with everything that needed to run below it. I’m fairly sure I’m not the only one who did this.
One of my favourites was Kylie Minogue. Can’t Get You Out of My Head. Specifically the la la section — not the verse, not the full chorus, just that pure repeating melodic fragment, stripped of words. Nothing to process, nothing to decode. Just the shape of the rhythm and the lift of the melody.
And at 120bpm it maps perfectly to 90rpm pedalling cadence.
So there I was. National Veteran MTB Champion. Three World Championship appearances. La la la la la la, going round and round in my head at the start line.
That’s not superstition. That’s applied neuroscience, arrived at through experience, long before the fMRI studies caught up. The melody was doing real work — setting tempo, setting mood, vamping the conscious mind while the body got on with racing. A holding pattern. A groove.
There was a saxophone player in our online community for a while. Accomplished, serious, genuinely musical. He decided to try guitar. It didn’t work, and eventually he disappeared from the group. I’d expected the transfer to be smoother. He had the vocabulary, the ear, the jazz language already internalised at a high level. What he didn’t have was the physical map of the instrument in his hands. And those turned out to be separate substrates that don’t automatically translate.
His ear knew exactly how far short his hands were falling. The beginner’s mercy — of not yet knowing what you don’t know — was completely unavailable to him. That gap is a particularly difficult place to live.
“Just let go, but practice a lot first” is a fine bumper sticker.
But some mornings the fuller version arrives on the bike, uninvited, at 90rpm, with a Kylie Minogue melody running underneath it.
The real conversation starts where the bumper sticker ends.
Earlier this year, Matt Warnock ran a series of live sessions he called a camp. The subject was the art of listening — specifically, the art of listening to jazz. It was a timely reminder that listening is not a passive act. It is something you develop, something you practice, something you can get better at.
I’ve been thinking about that ever since.
This morning I was working away on guitar in my room. The window was open. A chaffinch was singing in the garden, doing what chaffinches do, completely indifferent to what I was playing. Then for a moment, just a moment, it fitted perfectly. The bird’s phrase landed in a gap I hadn’t even noticed I’d left. It was one of those small, unrepeatable moments that stop you mid-phrase. It was perfect. Couldn’t have been more perfect.
My first instinct was to reach for a recorder. Capture it. Use it somehow.
Then I thought: use it for what, exactly? The moment was already gone. What made it perfect was precisely that it wasn’t arranged. The chaffinch wasn’t listening to me. I wasn’t listening for the chaffinch. We just happened to be in the same space at the same time, and something clicked.
That’s not something you can manufacture.
I’ve been turning this over in relation to how I work more broadly. I don’t catalogue my musical ideas. I don’t file licks under headings for later retrieval. I record a lot, and I drop material from one session into another — not systematically, but instinctively, the way a tape machine used to bleed ghost tracks through from previous sessions if you looked for a clean track on a well-used reel. The surprise encounter is part of the point. You can’t predict where something will fit, and the attempt to control that tends to kill the very quality you were trying to preserve.
Listening, real listening, might work the same way. Not hunting for something specific, but remaining open enough that what’s there can reach you.
The chaffinch didn’t study jazz. It didn’t attend a camp on the art of listening. It simply sang into the available space, without hesitation, without agenda.
I suspect it has something to do with the quality of attention you bring to a moment, rather than what you bring to it technically. Less acquisition, more presence.
The window is still open. The garden is quiet now.
But I’m listening differently than I was this morning.
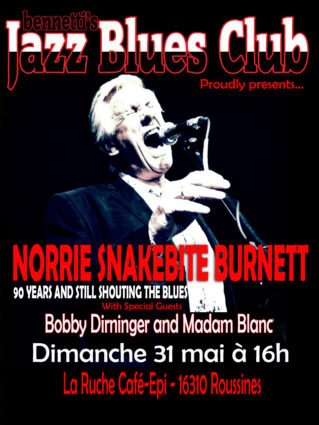
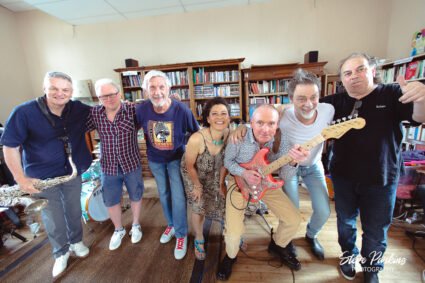
Norrie ‘Snakebite’ Burnett turned 90 this year. For those who know him, that’s not just a number — it’s a life fully and joyfully lived. Norrie loves to sing. He loves to get up in front of a band and shout the blues. He doesn’t get to do it as often as he’d like. So back in January, I decided to do something about that.
The idea was simple. Give Norrie a gig. A real one. For him. To celebrate his birthday and to let him do what he loves, in front of people who love him back.
The planning was quiet and mostly invisible, which is how it should be. A venue to find, musicians to book, a poster to design, tickets to sell. La Ruche Café-Epi in Roussines said yes. Then the musicians said yes. Then the tickets sold out. All of them. A 90-year-old blues shouter in a French village schoolroom, and not a seat to be had. That tells you everything you need to know about Norrie and the people who love him.
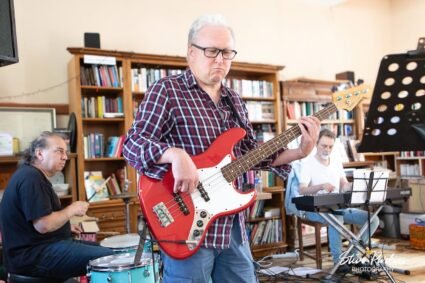
There were no rehearsals. None. The musicians — Bobby Dirninger on keyboards, Aroutian Karapatian on drums, David Donachie on bass, Gordon Menditta on saxophone — turned up on the day and trusted each other. That’s not luck. That’s what good musicians do. Playing with them was, quite simply, like being on holiday.
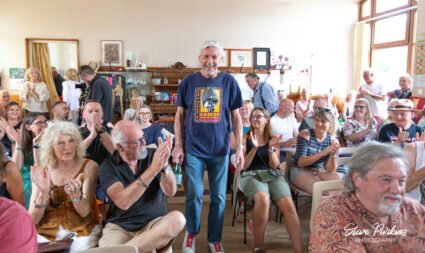
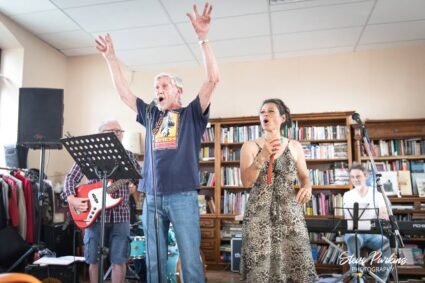
Madame Blanc opened the show. She set the tone with grace, style and no small amount of fire, and the room was hers from the first note. Then she brought Norrie to the stage.
What happened next is difficult to put into words, which is perhaps why Steve Parkins was there with a camera. Norrie took the microphone, raised his arms, and sang. The room responded the way rooms do when something real is happening — they leaned in, they smiled, they forgot about everything else. Robin Spence, who spent five years living in New Orleans, said afterwards that he hadn’t seen better. I’ll take that.
The musicians were exceptional. Every one of them. Bobby Dirninger is Norrie’s favourite keyboard player, and watching the two of them together said everything about why. Aroutian Karapatian held the whole thing together from the drums with a masterful authority that only the finest players possess. David Donachie on bass was exactly what a bass player should be — solid, present, dependable, musical. And Gordon Menditta on saxophone brought colour and warmth to every number he touched.
The audience were magnificent. Their warmth and generosity filled the room as surely as the music did. I watched their faces. The smiles said everything. Those who were there witnessed something genuinely special — the kind of afternoon that doesn’t come around very often, and that stays with you when it does.
Thank you to everyone who came. Thank you to Bobby, Aroutian, David and Gordon. Thank you to Andy Berry and the team at La Ruche for opening the doors and trusting us with the PA. Thank you to Steve Parkins for the photographs — they speak for themselves.
And thank you to Norrie ‘Snakebite’ Burnett. For the music, for the friendship, and for showing us all how it’s done.
There’s a thread on a Strat forum I’ve been part of for more years than I care to count. Every week, someone posts a backing track. The rule — if you can call it that — is simple: you play over it. Whatever it is. Whatever style. Whatever key centre it seems to inhabit. You don’t wait until it suits you. You just play.
I’ve been doing this for a long time now. Long enough that if I tried to calculate the number of tracks, the number of takes, the number of moments where I had absolutely no idea what I was doing, the number would be embarrassing in the best possible way.
And somewhere in all of that, I stumbled onto something I’ve been trying to articulate ever since.
We talk a lot about intention in music. The idea that you should know what you’re going to play before you play it — that great soloists have a plan, a narrative, a destination in mind when they open their mouth or press a string. There’s truth in that. Intention matters. Aimless noodling is its own kind of noise.
But intention has a shadow side. When I am too intentional — when I arrive at a backing track already knowing what I want to say — something closes down. I stop listening. I stop responding. I execute rather than explore. The music becomes a delivery mechanism for an idea I already had, rather than a conversation with something alive.
The weekly discipline taught me something about this. Because you can’t always be prepared. Some weeks the track is a slow blues and you feel settled. Other weeks it’s some lurching odd-time thing and you don’t know where the one is. And in those moments of genuine disorientation, something interesting happens: you have to find something rather than retrieve it.
That’s where accident comes in.
I don’t mean accident in the sense of mistake, though mistakes have their role. I mean the small collision between what you intended and what actually emerged — the note that wasn’t the note you aimed for, but turned out to be better. The phrase that surprised you as you played it. The moment where your fingers went somewhere your conscious mind hadn’t sanctioned, and it worked.
Those moments don’t come from nowhere. They come from years of practice, absorbed and half-forgotten, bubbling up without permission. But they also require a particular quality of openness — a willingness to not clamp down on the unexpected when it arrives.
The weekly forum discipline created exactly that condition. The pressure to produce something — anything — week after week stripped away the luxury of overthinking. You couldn’t afford to wait for inspiration. You had to show up, press record, and deal with whatever happened.
And what happened, often enough, was something better than what I’d planned.
I think about entrances a lot. How you begin a solo over a moving backing track is one of the most revealing things about a player. Do you wait for a landing point — the top of the form, a predictable resolution — before committing? Or do you enter mid-stream, trusting yourself to find the thread?
The players I most admire — and I’m thinking of people like Bill Frisell, who seems to exist in a state of perpetual gentle accident — don’t appear to need a clean runway. They arrive. They’re already in the middle of a thought when you hear them. The music was already happening before they joined it, and somehow they were always already part of it.
That’s not recklessness. It’s a kind of earned surrender — the product of so much intention, so many hours of deliberate practice, that intention itself becomes transparent. You stop being aware of it. You just play.
I’m a cyclist as well as a guitarist, and I’ve noticed the same dynamic on a bike. The races I remember most vividly are not the ones where everything went to plan. They’re the ones where something went wrong and I found a response I didn’t know I had. A gap appeared, or the pace lifted at the wrong moment, or the weather turned, and instead of consulting a plan I simply acted. And sometimes — not always, but sometimes — what I did was exactly right.
You can’t manufacture those moments. But you can create conditions in which they’re more likely to happen: consistent practice, genuine pressure, and the habit of showing up whether you feel ready or not.
The weekly forum thread is that, for me, on guitar. A small, low-stakes arena that has, over years, done more for my playing than almost anything else I can think of.
I said earlier that I’ve been trying to articulate this for a long time. The title I’ve landed on — Between Intention and Accident — feels like the right address for the idea. Not intention. Not accident. The territory between them, which is where, I think, most of the interesting music actually lives.
If you have a discipline like this in your own practice — something you return to week after week, not because it’s always comfortable but precisely because it isn’t — I’d be curious to know. And if you don’t, perhaps it’s worth finding one.
The backing track will be different next week. That’s the whole point.
I was watching a fellow guitarist playing a version of Girl from Ipanema this week — a tune we’ve all been working on together this month. He’s a capable player, but he always reaches for the complicated solution. Things that are beyond him, played with obvious effort, the joins showing. I found myself wondering why. Why make it harder than it needs to be?
It struck me that we are complete opposites.
My instinct, increasingly, is to simplify. To find the least amount that still does the job. Two notes instead of five. A silence held a beat longer than it should be. A chord left to ring until it starts to tell a different story.
That instinct didn’t arrive fully formed. There was a specific moment.
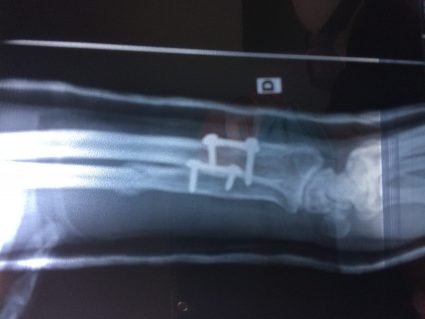
A couple of seasons ago I broke my right arm. Badly enough to spend a good stretch in a cast. And because I am who I am, I still picked up the guitar — carefully, awkwardly, with considerably less available to me than usual. You can’t attack anything with a broken arm in a cast. You can barely hang on.
So I didn’t attack. I played what I could reach. Slowly, with gaps. And somewhere in that enforced restraint I found something I hadn’t expected to find: I liked it. Not just in a “making the best of it” way. Genuinely liked it. I liked the idea of letting something be there slightly longer than it should. A note. A silence. A chord sitting in time and space until it either resolved naturally or started to drift outside of its original intention — starting to clash, starting to become something else. That tension between the thing you placed and the moment it begins to turn. There’s music in that gap.
The broken arm didn’t teach me technique. It taught me patience. It taught me that the guitar doesn’t need you to fill every available moment with something. Sometimes the most interesting thing you can do is put something down and then leave it there, and see what happens. I think about the player I was watching. The complexity is its own kind of effort — a constant forward motion, always reaching for the next thing. There’s nowhere to stop. But stopping is where a lot of the feeling lives.
The cast came off. The arm healed. But I kept the lesson.
Less isn’t a compromise. It’s a choice. And sometimes it’s the harder one — because there’s nowhere to hide in a two-note voicing, a long silence, or a chord that you’re willing to let become something unexpected.
There’s a quote I came across recently that stopped me in my tracks.
“The only way you will get to play beautiful jazz lines is to practice beautiful jazz lines.”
My first instinct was to agree. Then I started thinking about what it actually means — and that’s where it got interesting. Because if you take it literally, it sounds like imitation. Copy beautiful lines until they become yours. And there’s some truth in that. We all learn by absorbing what we love. But what if it means something else entirely? What if “practising beautiful jazz lines” means developing the capacity to create them — not copying, but reaching? Not imitation but intention.
That one shift changes everything. Almost every guitarist starts in the same place. First position. Open chords. The crowded, awkward end of the neck where beginners wrestle with finger pressure, string buzz, and chord shapes that bear little relationship to anything melodic. There’s a logic to it. It produces recognisable results quickly. Three chords and you’re playing songs. The family is impressed. Progress feels visible.
But underneath that logic is an assumption that goes largely unquestioned — that expression comes later. That you have to earn the right to be musical. Technique first, feeling second. Build the foundations, then somewhere up the road, if you work hard enough, the music will follow.
It’s a pyramid. And you start at the bottom.
Most teaching methods, most beginner books, most YouTube tutorials are built on this model. It’s so deeply embedded that it feels like common sense. Like there couldn’t possibly be another way.
But there is.
What if we’ve been doing it the wrong way round? Not wrong in the sense that nobody learns anything. Clearly people do. But wrong in the sense that the pyramid model quietly teaches something unintended — that musicality is a destination rather than a starting point. That creativity is a reward for technical diligence rather than the engine of it.
There’s a different position. A radical one.
Foster creativity from the outset. Not after the foundations are laid. Not when the student is ready. Now. From the very first note.
This doesn’t mean abandoning technique. The mechanics still matter — they always will. But it means keeping the expressive intent visible at every stage of the journey, rather than deferring it to some future point that may never arrive.
Think about what that means in practice. A beginner reaching for something that feels musical — however clumsily, however imperfectly — is doing something more valuable than an advanced player drilling patterns without feeling. The reach itself is the practice.
You don’t accidentally become creative. You have to practise being creative — and you have to start now, not later.
So where do you start? If not first position, then where?
The middle of the neck. Around the fifth to seventh fret. It sounds counterintuitive — isn’t that where you go after you’ve learned the basics? But spend a moment with the idea and it starts to make sense.
Physically, it’s a more comfortable place to be. The hand sits naturally. The stretches are manageable. You’re not fighting the instrument from the first note.
But more importantly — melodically, it’s where the guitar starts to speak. You’re in the voice of the instrument. Single note lines feel natural there. Phrases suggest themselves. You’re not wrestling with open strings and awkward chord shapes — you’re in the middle of the conversation.
And that’s the point. From day one, you’re thinking melodically. You’re reaching for phrases, for shape, for something that sounds like music. Not chord shapes to be memorised. Not patterns to be drilled. Music.
The creativity isn’t deferred. It starts here. Right in the middle.
But here’s where it gets really interesting.
I’ve been thinking about this as a beginner concept. A different starting point. But the more I sit with it, the more I think the real question isn’t about beginners at all.
It’s about the player who learned conventionally, worked hard, made progress — and then somewhere along the way, got stuck. Not stuck in an obvious way. They can play. They know their chords, their scales, their positions. But something is missing and they can’t quite name it.
They search for more complexity. More techniques. More things to learn. But the feeling doesn’t change. Because the problem isn’t what they know. It’s how they’re relating to what they know.
They were taught to build the pyramid. And they built it. But nobody told them what the pyramid was for.
For that player, the middle of the neck isn’t a starting point. It’s a way back in. A way of stripping away the accumulated habit of thinking technically, and rediscovering something that should have been there from the beginning.
The creativity that was deferred. And never quite arrived.
I should be honest. This is a theory, not a proven method. I haven’t taken a complete beginner and started them in the middle of the neck. I haven’t run the experiment.
To do it properly I’d need the right subject. Someone with enough faith in an unorthodox process to resist the pull of conventional milestones. No Knockin’ on Heaven’s Door after three weeks. No grade exams. Just the slow, patient business of learning to reach for something musical from the very first note.
That subject hasn’t appeared yet.
But the question feels important enough to ask out loud. Because if the pyramid model quietly teaches players that creativity is a destination rather than a starting point — and I believe it does — then we’re producing a lot of technically capable guitarists who don’t know what the guitar is for.
And that feels like a waste.
So I’m leaving this here as an open question. Not a conclusion. If any of this resonates — if you recognise yourself somewhere in these pages, whether as the stuck intermediate or the teacher who suspects there might be another way — I’d genuinely like to hear from you.
There’s a particular feeling that jazz gives you, unlike any other music I know. The deeper you go, the more there is. You learn something, truly learn it, and instead of the horizon getting closer it recedes further into the distance. It can feel vertiginous at times. Overwhelming even. And yet you always want to keep going.
This is not a bug. It’s the whole point.
But here’s where a lot of people come unstuck. There’s a common assumption — especially among self-taught musicians — that learning to play is a destination. You put in the hours, you acquire the skills, and at some point you can play. Ticket punched. Job done. What nobody tells you is that the ticket has no destination printed on it.
This is precisely where a tutor, a mentor, a musical confidant becomes not just useful but essential. And I’d argue that’s true at every level — beginner or fifty years in.
A good tutor doesn’t just correct your technique or hand you new material to learn. They see you clearly. They spot the comfortable habits you’ve stopped noticing, the safe ground you keep returning to without realising it. They know where you are in the journey, and they know how to nudge you somewhere new. Sometimes that nudge is a single idea that opens up a whole new stretch of horizon.
The ego is the enemy here of course. The further along you are, the easier it is to feel you’ve earned the right to go it alone. But I’d argue the opposite: the more you know, the more you need someone who can see past what you know. Someone who can say — keep going, you haven’t run out of road yet.
Jazz is an oral tradition. It was never meant to be learned alone. It was passed from player to player, on bandstands and in back rooms, through relationships as much as through music. A tutor keeps that spirit alive, whatever your level, whatever your age.
The horizon keeps moving. That’s the gift. Find someone who helps you walk towards it.
And here’s the thing nobody mentions when you start out: the journey will teach you far more than just music. Patience, humility, the courage to sound bad before you sound good, the ability to sit with uncertainty and keep going anyway. Jazz in particular has a way of holding a mirror up to who you are. How you handle frustration. How you respond to surprise. Whether you can let go of what you know in order to find something better.
A life spent with music, and with the right guide alongside you, is a life spent learning how to be more fully human. That’s not a bad return on a few hours of practice.
On jazz, bicycles, and the art of mischievous friction
There is a particular quality of thinking that happens on a long bicycle ride through a forest. The rhythm of the pedalling, the canopy overhead, the absence of interruption — it creates a space where ideas can unspool at their own pace. Last week, riding through the forest of Rochechouart, I found myself turning over a question I have been turning over for years without ever quite stopping to examine it directly. What actually is improvisation? And could it be considered spontaneous composition?
aimlessly drifting along…
The Case for Spontaneous Composition
The framing holds up reasonably well on first inspection. When you improvise, you are making all the same fundamental decisions a composer makes — melodic shape, rhythm, harmonic choice, tension and release, silence. The difference is the timescale. A composer can revise; an improviser commits in real time. But the act of musical decision-making is structurally identical. There is also the question of what improvisation actually draws on. Nobody improvises from nothing. You draw on internalised vocabulary, patterns, emotional states, the harmonic landscape under you, what the other musicians just played. In a sense, the composition happened over years of practice. The spontaneous moment is more like retrieval and recombination than pure creation from nothing — though that is arguably true of written composition too. But the framing gets complicated quickly. Composition usually implies some intention toward a fixed, repeatable object — a piece that exists independently of any one performance. Improvisation is inherently ephemeral and relational. It is shaped by the room, the rhythm section, a moment of hesitation from the bassist. That responsiveness is its most distinctive quality, and the word composition does not quite capture it.
Pre-loading the Stance
Thinking about this on the bike, I arrived at a description of my own practice that felt more honest than either composition or conversation. Sometimes I set out on a tune with an intention. Not a musical intention in the technical sense — not a plan for which scales to use or which substitutions to make. Something more like a dramatic premise. I might think: I am going to clash the hell out of this one. I am going to argue my way through it. That is how I feel today. And then I just play. What I am doing in that moment is pre-loading a stance. I am not pre-composing notes, I am pre-loading an attitude, an energy, a posture. The music then finds its own way through that filter. Two distinct layers operate simultaneously: the intentional layer, which is the mood or the argument I have chosen to bring; and the spontaneous layer, the actual notes and phrases that emerge in real time but have been given a direction to flow in. It is a bit like the difference between deciding how you are going to walk into a room versus the actual steps you take. The character is chosen; the choreography just happens. What strikes me about this is how physical and emotional it is before it is musical. You are not thinking about flattened ninths and rhythmic displacement — you are thinking: I am restless, I want friction. And then years of vocabulary serves that feeling without you having to consciously direct it. At a certain level of musicianship, technique becomes almost transparent. A clear medium through which something pre-verbal gets expressed.
Mischievous Friction
I would say — I do not always want to win the argument. Sometimes I just want to create some mischievous friction. That is actually a more interesting goal than winning, because winning implies a conclusion, a resolution. Friction that is genuinely mischievous stays alive. It does not resolve; it keeps the listener slightly off-balance, slightly unsure whether what just happened was intentional or whether you are about to fall over. That ambiguity is the point. For this to work, though, you need the right response from around you. If you are there trying to start a musical argument and the band is all peace and love, you are done. That is where the card up the sleeve comes in — the back-pocket contingency. Not just one pre-loaded attitude but a small repertoire of them. If the argument is not landing, you shift. Instead of clashing head-on, you go quiet and sardonic. You let the peace-and-love wash over you and then drop something slightly unsettling underneath it. Some tunes hand you more cards than others. Donna Lee, for example — lots of cards, but it is a tight fit shirt. The changes move so fast and so purposefully that there is not much room to lounge around in. And yet that constraint might actually serve the mischief rather than prevent it. When everything around you is that disciplined, even a small deviation stands out sharply. The tightness of the shirt makes every wrinkle visible. The tune becomes your straight man.
The Cyclist in the First Five Minutes
The best co-conspirators for this kind of playing share certain qualities. They have to be at ease and comfortable — because if someone is anxious about their own playing, all their attention is turned inward. They are managing themselves, not listening outward. There is no spare bandwidth for catching a wink across the room. They have to be confident — and this is separate from ability, which is an important distinction. A highly able player who is insecure can be the most rigid of all. They have the most to protect. Whereas someone with less technical firepower but a settled sense of who they are musically can afford to take risks, to go somewhere unexpected, because they are not worried about being exposed. And they have to be listeners. Because mischief in music is essentially a signal sent to another person. If they are not listening with that particular alert, open quality, the signal just goes into the air and disappears. The remarkable thing is that you can often spot all of this before a note is played. Just in how they set up, how they handle their instrument when nobody is officially listening yet. Whether they noodle with genuine curiosity or just run scales to fill the silence. Whether their eyes are open or closed to what is around them. It is exactly like going for a bicycle ride with someone new. You can tell within the first few minutes whether they know how to ride or not. Not from how fast they go or how fit they look — something in how they sit on the bike, how they handle the first corner, whether they are fighting the machine or simply in it. What you are reading in both cases is the same thing: confident familiarity. A relationship with something they have absorbed deeply over years. At a certain point it stops being a skill you perform and becomes a way you inhabit something. And the people who have it share one defining quality — they have no need to prove it. The moment you are proving something, you have introduced an audience into your head. You are no longer just doing the thing; you are watching yourself do it and managing how it looks. That internal observer is deadly to real presence.
Back Where We Started
I rode back into the village having gone around the question without quite answering it — which feels about right. The best loops do that. You arrive back at the start and it looks the same, but you are not quite the same for having gone round it. Improvisation is not spontaneous composition, not exactly. It is something more relational, more alive than that — shaped by the room, the other players, the particular quality of attention in the moment. But at its best, when the stance is pre-loaded and the right co-conspirators are in the room and the tune is handing out cards, it achieves something that written composition works very hard to simulate. It sounds like someone who has no need to prove anything at all.
By now, you’ve seen the clip. Stage 3 of the 2026 Volta a Catalunya. Remco Evenepoel and Jonas Vingegaard, alone inside the final kilometer. Remco enters a roundabout, hits a pothole, shifts his hand position — and goes over the bars.
The cycling world moved on quickly. Pothole. Bad luck. Remco blamed his hand position. Jonas showed sportsmanship by waiting. End of story.
But I’ve watched the slow-motion replay dozens of times. And something doesn’t add up.
Remco’s rear wheel lifts clean off the ground — the unmistakable signature of a front brake fully locked. A pothole can knock your hands loose. A pothole cannot squeeze your brake lever.
So what did?
What Everyone Saw
The official explanation is straightforward: Remco was moving his hands to the drops when he hit an unmarked pothole. The impact jarred his grip, he lost control, and he crashed.
That’s true as far as it goes. But it’s incomplete.
Watch the replay carefully. His bike doesn’t just wobble. The rear wheel rises like he’s hit an invisible wall. That’s not a steering correction gone wrong. That’s a front brake engaged at maximum force — at 50+ km/h, mid-corner, with no time to react.
The Missing Question
Here’s what no interviewer asked and no commentator raised:
Why did a pothole lead to a full front brake lockup?
The assumption seems to be that Remco simply grabbed a handful of brake by accident. But Remco Evenepoel is not a novice. He has thousands of race hours and some of the finest bike-handling skills in the peloton. He doesn’t “accidentally” grab fistfuls of front brake.
Something else happened. And I believe it comes down to a recent, overlooked change: his groupset.
The Switch No One Is Talking About
When Remco moved to Red Bull-Bora-Hansgrohe for 2026, he changed more than his jersey. He switched from Shimano Dura-Ace Di2 — his groupset for years at Quick-Step and Soudal — to SRAM Red AXS.
On paper, both are world-class. But on the road, they feel fundamentally different.
Feature
Shimano Dura-Ace Di2
SRAM Red AXS
Lever feel
Heavier, progressive
Feather-light, immediate
Initial bite
Aggressive (“grabby”)
Linear, builds with pressure
Force to max braking
High
Low
Modulation
Good
Excellent
Neither is “better.” But they are not interchangeable. And your hands know the difference — even if your conscious brain doesn’t.
The Muscle Memory Trap
Here’s the critical point that everyone has missed:
After years on Shimano, Remco’s braking reflex is calibrated to a specific force curve. When his brain says “hard brake now,” his hands automatically apply the amount of lever pressure that would produce maximum stopping power on a Shimano system.
But SRAM doesn’t need that much pressure. SRAM achieves full braking with significantly less lever force.
So what happens when a Shimano-trained rider grabs SRAM brakes at race speed?
The Two-Stage Over-Brake
I believe the crash unfolded in two stages — too fast for the naked eye, but visible in the physics of the bike:
Stage 1 — The Shimano Grab Remco hits the pothole, his hands shift, and instinct takes over. He pulls the lever with the force that would deliver aggressive Shimano bite. But SRAM’s initial feel is lighter. His brain registers: “Not enough braking.”
Stage 2 — The SRAM Overcorrection He squeezes harder — exactly as Shimano would require. But SRAM’s lever is designed for light action. That second-stage squeeze translates not into proportional braking, but into instant full lockup. The front wheel stops. The rear wheel lifts. The crash becomes inevitable.
This wasn’t one mistaken grab. It was a feedback loop — a mismatch between years of learned pressure and a new lever’s response curve.
Why No One Is Talking About This
If this analysis is correct, why has it been absent from every recap, interview, and comment section?
Sponsor pressure. No journalist wants to ask: “Did SRAM’s brake feel contribute to your crash?” That’s a career-limiting question.
Rider pride. Remco said, “I shifted my hand position, hit a pothole, lost control.” He’s not going to say, “The brakes responded differently than my body expected.” That sounds like an excuse, and pros don’t make excuses.
Technical illiteracy. Most fans and many reporters don’t think about force curves, bite points, or neuromuscular adaptation. They see a crash and look for a single visible cause. The pothole is right there. Case closed.
What This Means for Pro Cycling
If I’m right, this crash wasn’t bad luck or rider error. It was a predictable consequence of switching groupsets without retraining the rider’s braking reflex.
Teams spend hours on bike fits, power meters, and aerodynamic positioning. But how much time is dedicated to recalibrating a rider’s hands to a new lever feel?
We need:
Brake-force simulation drills during preseason for riders switching component sponsors
Lever tuning — adjusting reach, contact point, and modulation to approximate familiar feel
Pressure mapping to quantify the mismatch between a rider’s ingrained force and a new system’s response
Conclusion
Remco Evenepoel’s crash at Catalunya was not a simple accident. It was a collision between human instinct and machine design — a Shimano-trained hand grabbing a SRAM brake at 50 km/h, with a pothole as the trigger and physics as the judge.
The cycling world saw the pothole and moved on.
But watch the replay again. Watch the rear wheel lift. And ask yourself: What really stopped that bike?